In a quest to make our MacBook last out until next years rumoured major redesign (carbon fibre anyone?) we decided to do the trendy thing and install an SSD.
However we’ve always been used to having a big hard drive so the 128GB SSD we chose wasn’t going to allow us to hold our entire LightRoom library and video files on the laptop like we’re used to. The solution? Removing our un-used optical drive and replacing it with one of the recently launched 1TB 2.5″ 9.5mm hard drives. SSD speed plus a capacious spindle to store all our stuff on, does it get much better than this? It’s an easy project that anyone can follow. Here’s how we did it…
Buy Buy – Depending on your type of MacBook (ours is designated as a ‘late 2008 – 5,1’ model), the method will be slightly different, but most of what we did here is relevant to all MacBooks and MacBook Pros. After lots of reading these are the components we ordered for the project…
- SSD – Crucial M4 128GB SSD (CT128M4SSD2)
- Hard Dive – Samsung Spinpoint M8 1TB (HN-M101MBB)
- Caddy – OpitBay
The OptiBay adapter came without instructions, bar a little diagram on the side that shows you how to insert the drive. Luckily the Interweb sorted us out and the following video gives a good overview of the job.
There were a couple of little differences in our machine though and we found this iFixit document very helpful too. We recommend you watch the video and look through the iFixit doc too before setting out. Whilst there’s nothing difficult in the job there are some fiddly bits and it’s handy to have the proper tools including a plastic spudger.
Gotchas – Once the optical drive was removed we found the OptiBay was too big to fit in the space left and after a bit of head scratching we noticed a strip of plastic down one side of the unit that seemed to be a bit of an after thought. Taking it apart the strip down the edge was removed with a couple of screws. This left the unit a perfect fit. We can only surmise this plate that makes it wider is meant for another revision of the hardware, or another laptop completely. You also need to remove the little bracket shown on the right side of the photo below from the Apple DVD drive and attach it to the plastic frame of the OptiBay.

There are pre-drilled holes in the side of the caddy but you need quite a firm push to get the screws to start to self-tap. This bracket then becomes the single screw holding the OptiBay in (where there were 3 holding in the DVD drive), although this doesn’t really seem to be an issue as space is so tight anyway. You can buy an enclosure to fit your SuperDrive into to create an external DVD writer too if you need it.
Space Ship – We did a clean install of OSX 10.7 Lion from a USB thumb drive which we created following the excellent ScreenCastsOnline.com tutorial, (you’ll need a 8GB USB). Just boot from the USB, run Disk Utility and partition your SSD, then install Lion. All up and running in around 25 minutes. Beautiful.
Obviously you’ll want your OS and Apps to live on the super fast SSD and your data (music, photos, movies etc) on the spindle. A little terminal jiggery-pokery will create ‘symbolic links’ that point the relevant folders on your SSD to your HD. This is a system wide solution that means iTunes for example will automatically find Music on the DATA Hard Drive, iMovie will see the video files on the Hard Drive etc without having to make changes in each individual app. We followed this guide to setup the SymLinks.

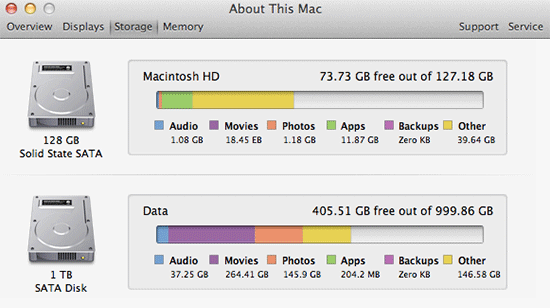
Part of the New OSX Lion ‘About This Mac’ Screen Showing the SSD and HD
The OS only took up around 14GB. With most of our apps re-installed and a 15GB Windows Virtual Machine file living on the SSD too, we’ve still got over 70GB free. So while it might be a little tight for future additions, it would definitely be possible to use the smaller 60GB SSD if you are adding a big hard drive.
…Off a Shovel – Obviously this project won’t magically turn your Core 2 Duo into a screaming i7 but it is a really significant and useful upgrade. We’ll leave all those great hardware review sites to do the pretty benchmark graphs, but in our un-scientific Automated Home Labs test the SSD showed huge improvements in speed. For example cold boot time went from 1 minute 4 seconds to just 24 seconds. Launching PhotoShop went from around 13 seconds to just 4. There also appears to be little or no distinguishable effect on battery life with the two drive setup (SSDs require less power than normal spinning drives so the additional load is minimal).
So with a few new components you can bring new life into your MacBook, or any other laptop / notebook / or desktop for that matter. As upgrades go, it’s highly recommended.
No products found.
Last update on 2024-04-08 / Affiliate links / Images from Amazon Product Advertising API


Nice article, M. Check out my experiences at http://www.thranblog.info with the same drive.