
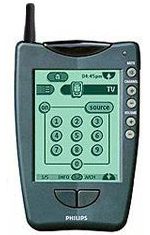
Submission by David Pullen – I have had a Philips Pronto for quite a long time now but it has not been the most popular control device in my house. It works well in integrating multiple IR remotes but it has not been very helpful in integrating with the rest of my HA system.
![]()
So… when I saw that an RF kit for the Pronto was available, I was very interested and sent my order straight off to Laser…
![]()
The kit arrived swiftly and consisted of a signal conditioning board, a transmitter, stubby aerial, some heatshrink tubing, instructions and a CD containing code generation software. The instructions were reasonably helpful although some elaboration would assist (see below).

Connection for the signal lead (One board variant)
Installation – The signal conditioning board and transmitter need to be soldered together which is pretty straightforward. I believe it is possible that the signal conditioning board will not be required for all implementations but as it will not interfere with operation I didn’t even bother to try installation without. You then need to make three connections to the Pronto: two to the battery terminals to provide power and one to the main board to pick up the signal. It is the last connection that is the trickiest and which may be in a different place depending upon the pcb in the Pronto. Before making the connections it is helpful to work out exactly where you will install the board, transmitter and aerial (as I discovered!). The best place appears to be in the top left of the rear case of the pronto. When you remove the back of the case you will see a large indented area that houses the batteries. On either side of the area is a narrow space. The left hand space (looking from the front of the Pronto) sits behind the Contrast and Backlight buttons and is large enough to contain the board and transmitter. Once you have decided on the location, make your connections to the Pronto in a way that facilitates routing of the wires. There is not much space between the PCB and the battery compartment so you want to avoid the wires passing between them. The solder pads mentioned in the instructions are fairly small but they do already have solder on them. A fine soldering iron will melt the solder quickly and it should be possible to make the connection very quickly. I understand that it is difficult to solder to the small gold-plated vias (the holes in the PCB) so do use the solder pads. The solder pad I used (in a late model RU890) is shown below. The signal you want is at the base of the transistor driving the emitters (see image).
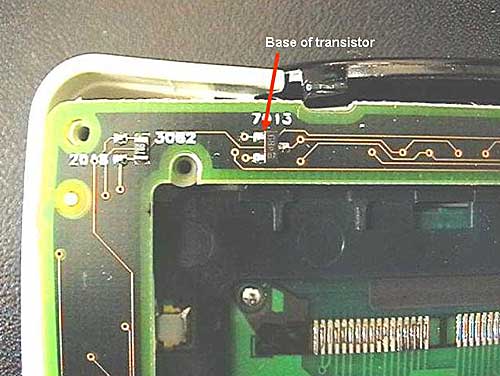
Transistor driving the emitters
The instructions suggest using a longer screw than that supplied to stabilize the aerial and make the connection to the transmitter. I decided to trim the base of the aerial to fit the top edge of the Pronto (which is not flat) and glued the aerial onto the case. I attached the wire from the transmitter to the aerial by soldering to a ring terminal covered with heatshrink tubing. I think glueing the aerial in place does make a neater installation and avoids fiddling around with the aerial screw.
RF Codes – Once the hardware is installed you need to set up the codes for X10 commands. The first 2 bytes tell the Pronto whether or not to modulate the signal. IR signals are sent out modulated, RF are not. The supplied software included CodeGen written by Dave Houston which will generate the codes for all X10 housecodes and devices. The process is a little painful as you need to set up the codes for every single operation, e.g. A2 on, A2 off, A2 dim, A2 bright. It may be possible to type in codes that will send A1 and then a separate signal for A on but I have not investigated yet and it is not provided within CodeGen. I set up several screens with the X10 codes and then used aliases in my different device screens to send the RF codes.
Since I had an MR26 and a UR51A remote I thought it would be useful to work out the other codes that the MR26 can receive, eg play, stop, fast forward, etc. After some analysis and a bit of trial and error I was able to work out the codes that were required for the Pronto to produce the relevant RF signals. I set the codes up with 3 repeats (CodeGen uses 5 repeats for the X10 codes) as I found this worked well. Too many repeats will slow down the speed at which the MR26 can receive commands; too few will result in the commands being missed. All the commands have been added to a single screen and again used as aliases.
I have provided a CCF file with the remote codes and On/Off for all housecodes except N. You can pick them up HERE. N is excluded because for some reason CCF compiler (from Olivier Couvreur) which I used to generate the CCF file crashed every time I ran it with the N housecode screens.
Note the screens are just designed to be used as aliases for the codes and they are rather crowded. They are not designed to be used as screens directly!
Range – I am getting very good range with the modified Pronto although it is a little sensitive to orientation and surrounding objects. My desk has a leather writing area that contains a metal sheet. Nothing is received if the Pronto is used within a few centimetres of the writing area.
When operating the Pronto at greater distances it helps to hold it so that the aerial approaches the perpendicular. In normal use, ie Pronto close to horizontal I get a range of about 25 meters through several brick walls and floors. When the Pronto is held upright I can send RF from about 50m from the receiver with several brick walls in between.
I have noticed a small number of missed X10 commands and so far I have not been able to determine if the problem has been with the transmission from the Pronto or the receipt by the MR26. However, to put this issue into context, I executed 40 on and off x10 sequences in the space of 80 seconds as a test for this article and none of the commands were missed.
Verdict – The kit is an excellent and relatively cheap (at approximately £30) way to enable an old Pronto to send RF. It appears to work well and the range seems to be good. There are a few oddities but then that always seems to be the case with RF. The conversion means that my old Pronto has gained a new lease of life and I have even been looking around on ebay for some other Prontos to convert. If you are using X10 RF and have an old Pronto then this kit is worth every penny.
BUY THE PRONTO RF KIT ON-LINE FROM LASER HERE : Download the CCF File HERE.
Want More? – Follow us on Twitter, Like us on Facebook, or subscribe to our RSS feed. You can even get these news stories delivered via email, straight to your inbox every day
Be the first to comment on "RF Kit for Pronto – Review"