I received these modules to review from Celtel at the start of December which was very timely. You see I’m all X-10’d up so I went across the road to my neighbours house with the appliance module, lamp module and remote…
Jonathan’s wife Amanda had put up the Christmas tree the day before. So I put the appliance module on that. The lamp module went on a table lamp in another corner of the same room. After fitting the battery into the remote and some brief fiddling with dip switches we were ready to go!
I’m pleased to say the system works faultlessly. In fact I was very impressed by it. The relay in the appliance module is much quieter than the annoying clunk that comes out of my X-10 modules. The lamp module also impressed. You see it remembers what level it was dimmed to when you switch it back on (something only the newer, more expensive X-10 modules do).
I think this system will have a wide appeal. It could be up and running in any ones house within minutes and without fuss. At £50 it represents especially good value for money (at the time of writing this article I reckon you need a minimum of £140 to do this using X-10).
Below is a copy of the text for this product that appears on Celtels disc catalogue..
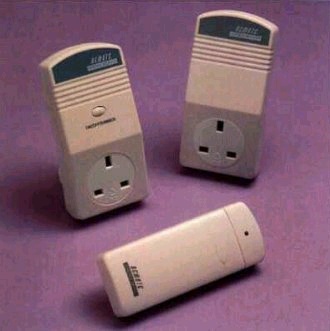
The Wireless Remote Control Switch system comes with a remote control handset and two remote plug modules (Lamp and Appliance). Each plug module controls one Lamp or Appliance. Each Lamp or Appliance should not exceed the rated wattage.
Available in UK, German or French Plug styles. BZT and DTI approval is held.
The remote control handset communicates with the remote plug modules using radio signals.
The system allows control of Four groups of modules. It is possible therefore to have say three Lamp modules on code A, two on code B, six on code C and ten on code D. All the modules with the same code would turn on or off at the same time.
Setting the House Code
To avoid interference from other nearby users of the same system, it is necessary to give your system unique “house code”. On the rear side of each plug module there is a bank of switches numbered 1 to 6. Use the tip of a pen or a screw driver to set the positions of the switches randomly. Ensure the same switches are selected as on the remote control handset.
To set the house code of the remote control handset, remove the detachable cover by sliding it to the end of the plastic case. Set the house code according to that in the plug station.
Setting the Device Code
A device code is a unique address code assigned to a remote plug module. There are four address codes to select from. The tiny switches labelled A, B, C and D define the address. To select an address code, move one of the switches to ON position. Only one switch in ON position is allowed among the A, B, C, D switches.
On the remote control handset, there are four big push buttons labelled A, B, C and D. Each button corresponds to a remote plug module with the same coded label.
Installing and Replacing Battery
After you have set the switches, install the battery. The remote control handset require a 12V battery. To install battery, loosen the screw on the battery compartment cover and install the battery. Be sure to observe the correct polarity (+ and – ) as marked inside the battery compartment. After you have installed battery, press one of the buttons and the indicator turns ON. If the indicator becomes dim or does not turn ON, replace the battery.
The remote plug modules are powered by the mains supply and do not require a battery.
On/Off
Press the Left Button on the remote control to cycle the module on or off. Alternatively press the button on the module itself (Lamp Module only)
Dimming (Module with button) This product is suitable for Incandescent Lamps only, it is not suitable for Fluorescent or Energy Saving Lamps. These could damage the module. The module can be controlled through it’s dimming cycle by holding the RIGHT button on the remote control or by pressing the button on the module itself continuously. If you press the RIGHT button once then the Dimming will be automatically started and you simply press the RIGHT button again when the desired level has been reached. If the unit is subsequently switched off when you switch back on the previously set brightness level will be maintained.
Specification
Lamp Module: Operating Voltage 230 AC +/- 10% Maximum Load 300 watts Resistive
Appliance Module: Operating Voltage 230 AV +/- 10% Maximum Load 1000 watts Resistive
Remote Control
Operating Voltage 12v Battery Type 23A (Supplied) Control Distance Up to 18 Metres (may be limited by internal walls etc.)
Code Combination 64
* Weight 400g * Dimensions Modules – 7cm x 13cm Remote Control – 12cm x 5cm * C.E. Approved
WR0450-4 UK Style WR0450-3 German Style WR0450-2 French Style
Approximate Price £50
Available From Celtel
Be the first to comment on "X10 Wireless Switch (WR0450-40) – Review"